How to Crochet the Cutest Capybara with Shorts Free Tutorial
Designer: Keti Amigurumi | Ekaterina Krikun
VK: @keti_amigurumi
Difficulty Level: Easy
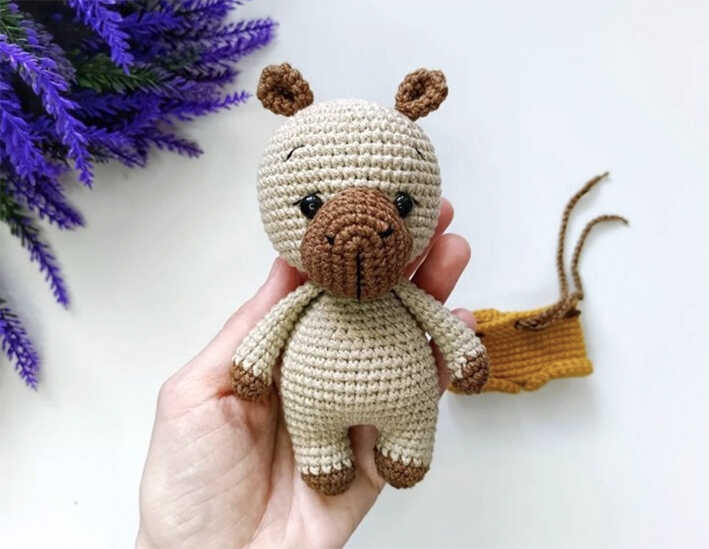
Soft, cuddly, and trendy — this little friend is ready to join your collection…
Capybaras have taken the world by storm. They provide the ultimate inspiration for your next DIY Crochet Gift Ideas and seasonal decor. This stylish character features a unique removable pair of shorts to add a playful touch to your Easy Crochet Projects. Designers crafted this as a Low Sew Amigurumi Pattern to ensure a seamless look with minimal assembly. We are incredibly grateful to the designer, Ekaterina Krikun (Keti Amigurumi), for sharing this lovely Free Pattern with us. At the end of this post, you will find a gallery of stunning amigurumi capybara fikirleri. If you want a trendy wildlife project that looks amazing, this tutorial is a perfect place to start.
This Beginner amigurumi capybara pattern helps you master how to crochet amigurumi while practicing basic shaping. The construction remains simple because you crochet the arms directly into the body. You only need to sew the head at the end. It serves as a Quick to Make Amigurumi that works perfectly with any cotton blend like YarnArt Jeans or Gazzal Jeans. While we used Cotton Yarn for a crisp finish, you can also use Velvet Yarn for a chunky version. Note that using velvet will make the final toy much larger!
To bring this 2026 trend to life, prepare 2.0 mm hooks, your favorite yarn, and 8 mm safety eyes. The process involves fiberfill, a tapestry needle, and black embroidery thread for the muzzle expressions. By following this step by step guide, you will master the removable clothing technique with ease. Don’t forget to visit the Amigurumi Bunny Free Pattern for more beginner friendly projects. Scroll down and let’s start stitching!

Materials And Tools
• YarnArt Jeans or Gazzal Jeans yarn
• Thread for facial details
• Crochet hook 2–2.5 mm
• Safety eyes 8 mm
• Stuffing
• Stitch markers
• Pins
• Needle for sewing parts
• Scissors
Abbreviations
MR – magic ring
ch – chain
sl st – slip stitch
sc – single crochet
inc – increase
dec – decrease
(…) x n – repeat the instructions in parentheses n times
MUST-TRY AMIGURUMI CAPYBARA FREE CROCHET PATTERN
Head
R1: 7 sc in MR
R2: inc x 7 (14)
R3: (1 sc, inc) x 7 (21)
R4: (2 sc, inc) x 7 (28)
R5: (3 sc, inc) x 7 (35)
R6: (4 sc, inc) x 7 (42)
R7: (5 sc, inc) x 7 (49)
R8–R18: sc around without changes
R19: (5 sc, dec) x 7 (42)
R20: (4 sc, dec) x 7 (35)
R21: (3 sc, dec) x 7 (28)
R22: (2 sc, dec) x 7 (21)
R23: Make 3 decreases evenly around the round, then sc to the end (18)
Insert eyes between R14 and R15, with 7 sc between the eyes.
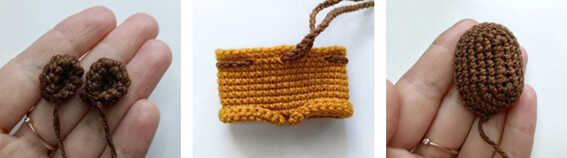
Ears
Use dark brown color.
R1: 7 sc in MR
R2: inc x 7 (14)
R3–R4: sc around
R5: (1 sc, dec) x 4, 2 sc (10)
Leave a long tail for sewing.
Muzzle
Chain 7.
R1: In the 6th chain from the hook: inc, 4 sc, 3 sc in one stitch (turn work), 4 sc, inc (15)
R2: 2 inc, 4 sc, 3 inc, 4 sc, 2 inc (22)
R3: 2 sc, 2 inc, 4 sc, 2 inc, 2 sc, 4 sc, 2 inc, 2 sc (30)
R4–R6: sc around without changes
Arms
Change color in R4.
R1: 6 sc in MR
R2: inc x 6 (12)
R3–R4: sc around
R5: 2 dec, 8 sc (10)
R6–R14: sc around
Stuff halfway and flatten the arm, crocheting the sides together.
Legs And Body
Change color in R4. Start with the legs.
Legs
R1: 6 sc in MR
R2: inc x 6 (12)
R3: (sc, inc) x 3, 6 sc (15)
R4–R7: sc around
Fasten off and cut yarn. Make the second leg the same, but do not cut the yarn.
Body
R1: Ch 4, join to the first leg with sc. Crochet around to get 38 sc total
R2: 4 sc, inc, 2 sc, inc, 16 sc, inc, 2 sc, inc, 10 sc (42)
R3–R8: sc around
R9: (5 sc, dec) x 6 (36)
R10: sc around
R11: (4 sc, dec) x 6 (30)
R12–R13: sc around
R14: (3 sc, dec) x 6 (24)
R15: sc around
R16: (2 sc, dec) x 6 (18)
R17: sc around, crocheting the arms into the sides
R18: sc around
Leave a long tail for sewing the head.
Assembly
When sewing on the muzzle, position it between the eyes around R14.
Embroider the nose.
Sew the head to the body stitch to stitch.
Sew the ears on the top of the head between R4 and R5.
Embroider eyebrows and eyelashes.
Shorts
The shorts are very simple. Crochet a chain based on the waist measurement of your toy.
R1: Chain 40, join into a circle and crochet 40 sc around
R2: 40 sc, making chain spaces every 4–5 stitches to create holes for the drawstring
R3–R10: sc around (40)
Sew the middle to form the shorts. Crochet around each leg opening:
First round: through the front loops only
Second round: through both loops and fold the edge
Make a cord and thread it through the shorts.
Copyright And Credits
This crochet pattern is intended for personal use only.
Reproduction, redistribution, or publication of this pattern or its translated versions is not permitted without permission from the original designer.
Design by Ekaterina Krikun (@keti_amigurumi).